慕斯利安優酪乳蛋糕!的做法
飲食不健康是很多疾病發生的一個主要原因, 在平時我們應注重飲食健康, 最好是自己在家裡做飯, 慕斯利安優酪乳蛋糕!的做法不難, 而且價格也實惠, 是普通人都能接受的, 想要吃上健康美味家常菜的朋友不妨好好把握。


1、把所有材料一一準備好!待用!

2、先把雞蛋黃, 蛋白分離!蛋白要放在無油無水的容器裡哦!

3、蛋黃加入優酪乳!

4、把優酪乳和蛋黃攪拌!

5、像這樣攪拌均勻細膩!

6、把70克低勁麵粉篩入蛋黃裡!

7、把加入麵粉的蛋黃糊攪拌均勻細膩!

8、蛋黃糊做好就可以打發蛋白霜叻!先在蛋白裡加入2-3滴的檸檬汁, 打發蛋白粗泡後再加入糖, 糖分三次加入!

9、把蛋白霜打發成硬性泡沫,泡沫起尖不會彎就打發好了!

10、將三分之一的蛋白霜放入蛋黃糊裡!

11、加入蛋白霜的蛋黃糊上下攪拌均勻細膩!

12、再把攪拌好的蛋黃糊倒入剩餘的三分之二的蛋白霜裡!

13、上下攪拌均勻細膩!倒入磨具裡,我撒了點白芝麻!震動幾下消除點氣泡!烤箱預熱170度!

14、烤盤放水隔水烤,170度烤20分鐘左右!再轉150度45分鐘左右就好叻!

15、烤好後摔下磨具,馬上倒扣晾涼!

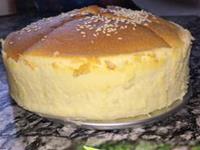
16、這個是多出來的,看組織蠻蓬鬆的哦!我的磨具是6寸的哦!

17、晾涼後的蛋糕脫模!如果放在冰箱口感會更加好哦!
自己花點時間做些簡單的菜肴,不僅美味還能保持健康,還是值得的,慕斯利安優酪乳蛋糕!的做法簡單,適合忙碌上班族。
9、把蛋白霜打發成硬性泡沫,泡沫起尖不會彎就打發好了!
10、將三分之一的蛋白霜放入蛋黃糊裡!
11、加入蛋白霜的蛋黃糊上下攪拌均勻細膩!
12、再把攪拌好的蛋黃糊倒入剩餘的三分之二的蛋白霜裡!
13、上下攪拌均勻細膩!倒入磨具裡,我撒了點白芝麻!震動幾下消除點氣泡!烤箱預熱170度!
14、烤盤放水隔水烤,170度烤20分鐘左右!再轉150度45分鐘左右就好叻!
15、烤好後摔下磨具,馬上倒扣晾涼!
16、這個是多出來的,看組織蠻蓬鬆的哦!我的磨具是6寸的哦!
17、晾涼後的蛋糕脫模!如果放在冰箱口感會更加好哦!
自己花點時間做些簡單的菜肴,不僅美味還能保持健康,還是值得的,慕斯利安優酪乳蛋糕!的做法簡單,適合忙碌上班族。