蔓越莓牛奶吐司的做法
可能有些人會把自己在家裡做飯想得太複雜, 事實上, 只要掌握一些簡單的菜譜, 想要自己在家吃上一頓美味又營養的晚餐並非不可能, 蔓越莓牛奶吐司的做法就很容易, 即使沒有烹飪天分, 也能讓家人吃上美味的菜肴。


1、備好食材, 稱重。

2、除蔓越莓暫不放入外, 按先液體後固體順序把食材倒進麵包機(酵母最後放, 放在高筋麵粉上面, 不要沾到液體)。

3、麵包機啟動“自動和麵”功能。

4、5分鐘後, 麵包機和麵完成發出提示音, 把和好的麵團取出。

5、手工搓揉幾下麵團, 讓麵團看上去更細膩。

6、平均分成三份。

7、把其中一小塊麵團擀成長舌狀, 鋪上蔓越莓。

8、從一頭向另一頭卷起成卷狀。

9、再擀一次成舌狀。

10、再卷起(卷兩次是為了讓蔓越莓粘牢固)。

11、把卷好的三個小卷介面朝下放進吐司模具,排列好。

12、放進烤箱調到“發酵”檔,發酵至八分滿(夏季天氣炎熱時可常溫下發酵。)

13、發酵完畢,放進已預熱好的烤箱,170度烤40分鐘。

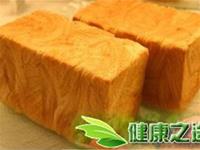
14、出爐後可立即脫模,美美噠。

15、切塊的效果不錯哦!

16、拉絲挺好的。
蔓越莓牛奶吐司的做法簡單,即便你是新手新媳婦也能做出來。自己做出一道適合家人味道的菜是很有成就感的。
9、再擀一次成舌狀。
10、再卷起(卷兩次是為了讓蔓越莓粘牢固)。
11、把卷好的三個小卷介面朝下放進吐司模具,排列好。
12、放進烤箱調到“發酵”檔,發酵至八分滿(夏季天氣炎熱時可常溫下發酵。)
13、發酵完畢,放進已預熱好的烤箱,170度烤40分鐘。
14、出爐後可立即脫模,美美噠。
15、切塊的效果不錯哦!
16、拉絲挺好的。
蔓越莓牛奶吐司的做法簡單,即便你是新手新媳婦也能做出來。自己做出一道適合家人味道的菜是很有成就感的。